Home › Forums › Bike Preparation Tips › Bike Preparation Tips › Fitting a new Clutch
This topic contains 12 replies, has 0 voices, and was last updated by Sean 14 years, 7 months ago.
-
AuthorPosts
-
April 1, 2010 at 4:06 am #98266
So some of you maybe following the thread regarding Crash’s up and coming condo 750 ride and it was mentioned that once the bike was sorted and rubber fitted it was found the clutch was slipping. All the normal things checked out, clutch had free play at the arm etc. Crash with no time to muck around ordered new friction plates, steel plates and pressure springs.
This morning I grabbed his bike on the trailer over to my place. I already had the clutch parts as I picked them up the day before, the friction plates I had soaking in engine oil ready to go.
Firstly threw the bike on its side (bike had no problem with that spends a fair bit of ride time there :laugh: )

By doing this I dont need to drain the gearbox / engine oil and prevents any dripping mess
Undo the 7 Bolts around clutch cover, thankfully Honda run a rubber “o” ring so its reusable

Cover off, now undo the 4 bolts that retain and the springs that clamp the clutch plates to provide drive, when you pull the clutch in you pull against the springs unclamping the plates

Weak springs here reduce the pressure the plates are clamped together with which can cause the clutch to slip, to stiff a springs makes the clutch harder to pull in need a balance
Pressure off the springs and 3 of the bolts removed

Now to measure the springs and compare them against the new ones
Old 47.30mm

New 48.57mm
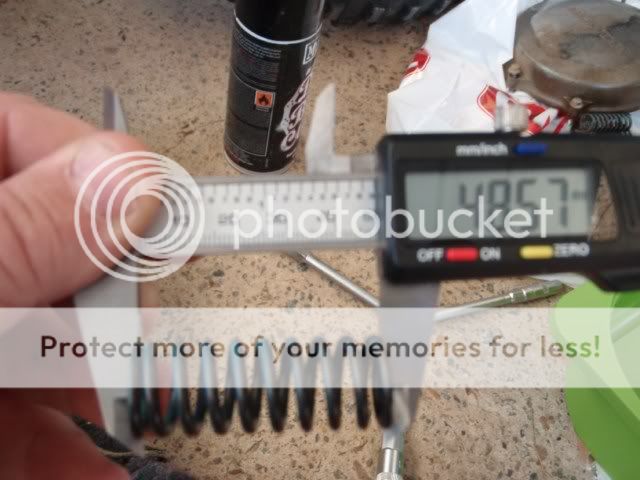
So about 1.2 mm difference and well within spec of 45.40mm
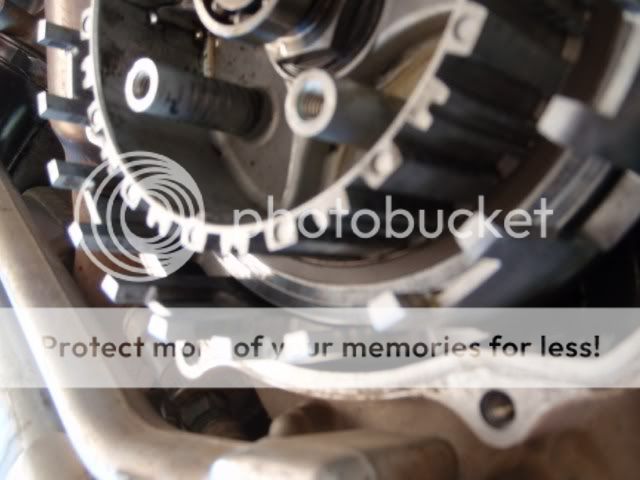
I then pulled the clutch pack out 1 plate and steel spacer plate at a time to inspect them all and keep them in order for easy reassembly. First thing I noticed was how burnt the clutch facing material was and the steel spacer plates had been blued. Crash does use a fair bit of clutch slipping you have to on a XR650 in some of the tight going, also on his last wet ride the clutch may have been slipping a bit and being wet he may not have noticed. When the clutch slips it generates huge amounts of heat, thus the bluing you see in the photos

Once into a nice stack and sorted there are no other dramas the clutch baskets fingers are inspected these are ok
The plates soaking in oil waiting assembly

I used some of the quailty Muc-Off disc brake cleaner to clean the packaging goo of the steel plates
Reassembling via the old stack if in doubt, steel plate

Last fibre plate

Pressure plate bolted back on with new springs
Finished

For this job I used a “Y” brace 8mm, 10mm and 12mm. 1/2 litre of engine oil, clean tin to soak the plates, a rag and the Muc-off disc cleaner. The verniers you could do without.
The job took 15mins including taking the photos and is very simple. If in doubt lay it out go step by stepThe test ride confirmed the repair, third and fourth gear wheelies Crash no slip
")
Now to write the invoice and the job is done
TB
April 1, 2010 at 4:20 am #175137
AnonymousGood write-up TB
") April 1, 2010 at 4:34 am #175140
April 1, 2010 at 4:34 am #175140Moto wrote:
Quote:Good write-up TBYes indeed and quality ALDI Verniers to I see :laugh: :laugh:
Ollie
April 1, 2010 at 4:41 am #175141Good write up TB,hopefully it will show how easy a job it is and inspire other blokes to have a go when the time comes to replace clutch plates.
Couldn’t help noticing that factory brake snake thing,that looks the goods.
April 1, 2010 at 5:29 am #175138TB,
If the basket fingers are notched can they be filed down or is it a case for a new basket. Do they tend to notch on the outer finger or the inner or both.
The bolts on the springs. Do they get done up tight (ie. hard up against the threaded stems) or do they get done up to point where the springs are compressed to a certain tension.
Thanks for the post. It helps me heaps.
April 1, 2010 at 5:58 am #175150Bundyroy wrote:
Quote:TB,If the basket fingers are notched can they be filed down or is it a case for a new basket. Do they tend to notch on the outer finger or the inner or both.
They notch on the driven side and yes they can be filed which ever side that is in that case
The bolts on the springs. Do they get done up tight (ie. hard up against the threaded stems) or do they get done up to point where the springs are compressed to a certain tension.
The bolts do up tight against the post in the basket, that with the height and tension of the springs sets the spring load on the plates
Thanks for the post. It helps me heaps.
Happy it helps
TB
April 1, 2010 at 8:29 am #175152Nice work TB. Good easy to understand instructions.
Get rid of those digital verniers mate, they are crap. They issue them to builders cause that about how accurate they are.
 April 1, 2010 at 8:30 am #175153
good to see you fixed his clutch TB it was sliping on the orange to hillend ride when i rode his bike should go heaps better now
May 22, 2010 at 10:56 am #175139Trailboss wrote:
Quote:So some of you maybe following the thread regarding Crash’s up and coming condo 750 ride and it was mentioned that once the bike was sorted and rubber fitted it was found the clutch was slipping. All the normal things checked out, clutch had free play at the arm etc. Crash with no time to muck around ordered new friction plates, steel plates and pressure springs.This morning I grabbed his bike on the trailer over to my place. I already had the clutch parts as I picked them up the day before, the friction plates I had soaking in engine oil ready to go.
Firstly threw the bike on its side (bike had no problem with that spends a fair bit of ride time there :laugh: )
By doing this I dont need to drain the gearbox / engine oil and prevents any dripping mess
Undo the 7 Bolts around clutch cover, thankfully Honda run a rubber “o” ring so its reusable
Cover off, now undo the 4 bolts that retain and the springs that clamp the clutch plates to provide drive, when you pull the clutch in you pull against the springs unclamping the plates
Weak springs here reduce the pressure the plates are clamped together with which can cause the clutch to slip, to stiff a springs makes the clutch harder to pull in need a balance
Pressure off the springs and 3 of the bolts removed
Now to measure the springs and compare them against the new ones
Old 47.30mm
New 48.57mm
So about 1.2 mm difference and well within spec of 45.40mm
I then pulled the clutch pack out 1 plate and steel spacer plate at a time to inspect them all and keep them in order for easy reassembly. First thing I noticed was how burnt the clutch facing material was and the steel spacer plates had been blued. Crash does use a fair bit of clutch slipping you have to on a XR650 in some of the tight going, also on his last wet ride the clutch may have been slipping a bit and being wet he may not have noticed. When the clutch slips it generates huge amounts of heat, thus the bluing you see in the photos
Once into a nice stack and sorted there are no other dramas the clutch baskets fingers are inspected these are ok
The plates soaking in oil waiting assembly
I used some of the quailty Muc-Off disc brake cleaner to clean the packaging goo of the steel plates
Reassembling via the old stack if in doubt, steel plate
Last fibre plate
Pressure plate bolted back on with new springs
Finished
For this job I used a “Y” brace 8mm, 10mm and 12mm. 1/2 litre of engine oil, clean tin to soak the plates, a rag and the Muc-off disc cleaner. The verniers you could do without.
The job took 15mins including taking the photos and is very simple. If in doubt lay it out go step by stepThe test ride confirmed the repair, third and fourth gear wheelies Crash no slip
Now to write the invoice and the job is done
TB
Thanks TB for this write up I ordered a new EBC kit with springs and all the plates on ebay and did it today .At first I was a little worried but it all turned out well once I did my test ride.I have a brand new Metzler as well so the ol XR is ready for some work
May 23, 2010 at 8:36 pm #179815Hey glad it helped XRtrailhack, I love the real DIY stories from contributors here and thought I would do one myself. We did a good tyre change video with explanations at the Kenda I will post up. Also we are having a tyre change and tech night at Sutto’s on a thursday soon where tyre changing and other trail side tips will be discussed and hands on learning will be supervised by Sutto and some of the other experienced guys there. Pizza and refreshments as well :laugh:
TB
October 14, 2011 at 11:25 pm #179848OK this thread is older than my undies, is there a consent on the best replacement clutch to use. Mine only has about 4600 k’s on her (02 model) owned it for about 15 months and have a small/occassional amount of slippage
Whats the preference ??
October 15, 2011 at 5:02 pm #210423Burkey wrote:OK this thread is older than my undies, is there a consent on the best replacement clutch to use. Mine only has about 4600 k’s on her (02 model) owned it for about 15 months and have a small/occassional amount of slippageWhats the preference ??
Hi Burkey, the kit above I fitted to Crashes bike was just a basic kit he got local. Two thoughts here from me, my clutch is 45k old its done A4DEs, trail rides, Condos, Yellow Mountains etc and still doesnt slip and I fan the shit out of it. The clutch in mine is a Nick Doyle Tekinks special which has CR250 plates and no judder spring plate I am told, if you are interested ring 02 47322622 and speak with Nick. I cant recommend that setup enough. My other thought would be a Barnett clutch kit, they are tough unbreakable and good value for money.
Hope some of the above helpsTB
October 15, 2011 at 6:34 pm #210441Thanks TB
Will be going to Teknik to see about a rear spring for the young blokes bike so that makes it easy
regards
Burkey
-
AuthorPosts
You must be logged in to reply to this topic.