Forum Replies Created
-
AuthorPosts
-
Very nice mate – I saw the first pic over at DBW, looks cool
")
Cam chain? It doesn’t come off it just slops down as you pull the cylinder and head off then you have to pass it up through the housing as you re-install.
1 compression ring and 3peice oil scraper – I put the gaps on either side and made sure they were lined up in the vicinity of the pins.
I’m done for the night now – had one of “those moments” that I have to share. I was torquing up stage 1 of the head bolts using my purdy new torque wrench and had the downsizer on to use my 1/4″ 10mm socket and I felt it ease up a fair bit away from the 40Nm I was aiming for. My nuts slipped up into my tummy like they did when my oil drain bolt eased up some time ago. I figured if it had done damage then I best test it and wound it on a little more and it let go completely! I took the wrench off and found that the adaptor had sheared off and almost fell over in relief.
Unfortunately that means that I can’t torque down the cam bridges but I’ll be able to finish that off tomorrow after I’ve bought a decent adaptor.
Speaking of the weekend, I’m still nervous about this water pump seal as my parts haven’t come in and I don’t want to rip the seal carrier off because I can’t see a way to do it without damaging it and I don’t know if they ordered a repair kit including the carrier and o rings or just new seals.
Fingers crossed!
Next question!
Is it necessary to give the valve faces and underside of the head a rub to clean it up? I’m guessing scotch brite pad would be too much so I’ll just give it a solid wipe with a rag.
Oil rings were 0.8 and 0.5 and max is 1.0 so I’m installing the piton…. again! haha At least I’ll know its right though thanks very much – I would’ve hate to have learnt that after it was all back together or worse still when something went wrong!
Measuring the oil rings was difficult – I had to take them off the piston and slide the old piston into the barrel and then sit the ring on top and measure and it was difficult to get my feeler gauges into that corner. If I measured it on the piston is squeezed the ring out and gave a high gap reading.
Mr Blue wrote:
Quote:Whatever technique of build you use always preoil the wrist pin and bearingRing end gap is best done suing an old piston to square the new rings in the barrel.
BC
I just measured using the barrel and the new piston and I got 0.5mm for the compression ring.
By “wrist pin and bearing” do you mean the pin that holds the piston on the conrod and the sleave in the conrod?
Axel, did you ever have to replace the water pump seal? I have the rotor off and I’m trying to figure out how to remove the carrier without ripping it apart but I can’t figure it out. Any tips would be appreciated.
Thanks. I just checked your link ekips and you’re right so I’ll have to pull the piston and cylinder back off and re-check it and if its no good I’ll take it to the shop tomorrow to get filed. I have no vice or diamond nail file.
Yeah nothing on it there though.
I just checked again and the repair manual is only giving a max end gap for both comp and oil rings being 0.8 and 1.0 respectively. I’ll have to look further!
:angry: It takes me 5 minutes just to get the bloody clips out!
What did you mean by the piston clip grooves? You mean the slot to get the circlip out? I’ll have a look in my manual for the ring end gap specs now :dry:
If my crude measurement got 0.3mm wouldn’t that mean they’re definitely under the 0.8mm maximum? Is there a minimum gap?
Bugger that means I’m back to the beginning! Oh well at least I’m getting plenty of practice with this!
I’m using a CP piston and there was no pins.
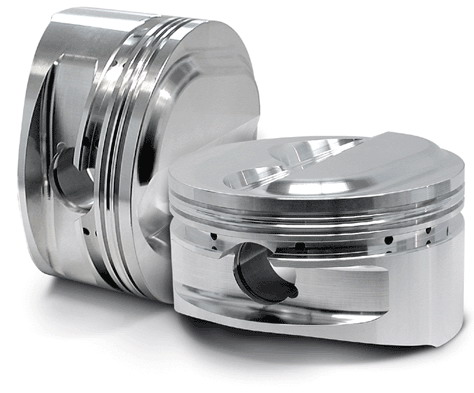
I’m pretty sure that the gaps were staggered too though if they weren’t it’d be quite a coincidence.
As long as Admin doesn’t mind then I happy for a bit of light humour in here haha.
I’m in the dog house for spending too long down there and not cooking the bbq earlier so didn’t get finished
")
WRT the end gap if its safer to take it back apart and check the gap I will and I can confirm that I didn’t score the cylinder while I’m at it. If not I’m due to put the head back on tomorrow and get my new torque wrench spinning!
I’m not in too much of a rush as I’m waiting for my water pump seal to come in before I can finish for the weekend’s ride. I’m thinking about how I can “run it in” without getting pinched by the fluff too! Maybe with daylight savings I can duck over to west wallsend friday arvo.
Since I had the head off and I’ve done about 1700kms since the last change I chose to put a new piston and ring in. I didn’t measure the end gap on the old ring but it didn’t appear damaged and the cylinder had no unusual markings so I just went with the new gear as preventitive maintenance. I thought my mechanic put a CP in last time but it turned out to be a wiseco so I’m not sure if it was high comp or not but the head certainly looks thicker/higher.
All good fun!!!
OOOOOOOKKKKKKKKKKK…………………. So maybe I should’ve asked for tips before I started! I took the piston back off and put the cylinder over the piston by using the tapered edge my fingers. Once I had it on I just lightly tapped it with the hammer handle to slide it up as even as possible.
Now that I’ve read Blue’s post I have a couple of other concerns. I didn’t check the ring end gap accurately at all. All I did was insert the ring into the cylinder and got it roughly level then measured 0.3mm for the gap on the compression ring. For the oil rings I just checked that they didn’t overlap. Should I take it back out and check it more accurately? What do I do if the gap isn’t correct?
I also didn’t line the gaps up with the pins. I assume this is done to prevent the ring ends from scratching the cylinder?
Here I was sitting on the couch eating dinner thinking I’d done well

-
AuthorPosts